
| 일 | 월 | 화 | 수 | 목 | 금 | 토 |
|---|---|---|---|---|---|---|
| 1 | 2 | 3 | 4 | 5 | ||
| 6 | 7 | 8 | 9 | 10 | 11 | 12 |
| 13 | 14 | 15 | 16 | 17 | 18 | 19 |
| 20 | 21 | 22 | 23 | 24 | 25 | 26 |
| 27 | 28 | 29 | 30 |
- Node
- mariadb
- javascript
- nginx
- laravel
- php
- SQL
- NCP
- 기초 수학
- Backbone.js
- docker
- python
- Machine Learning
- Switch
- Go
- AWS
- nodejs
- rabbitmq
- deep learning
- For
- Redis
- fastapi
- webpack
- phpredis
- linux
- React
- 블레이드 템플릿
- CentOS
- Babel
- Redux
- Today
- Total
개발일기
React - Socket.io client/server 활용법 본문

Socket.io란?
- emit : 데이터를 보내는 함수이다. 클라이언트는 서버에게, 서버는 클라이언트에게 데이터를 보낸다.
- on : 데이터를 받는 함수이다. 클라이언트 서버로부터, 서버는 클라이언트로부터 데이터를 받는다.
Socker.io를 사용하여 서버와 클라이언트 간에 데이터를 주고받는 결과를 확인하기 위해 간단하게 서버와 클라이언트를 생성하여 결과를 확인할 수 있다.
1. 서버 생성
1-0. package.json 생성
npm init -y
yarn init -y
1-1. Express 설치
npm install express
yarn add express
서버는 노드의 express를 사용하여 서버를 오픈할 것이다.
1-2. Socket.io 설치
npm install socket.io
yarn add socket.io
소켓 통신을 위해 소켓을 설치한다.
1-3. http 설치
npm install http
yarn add http
http의 createServer() 메서드를 통하여 서버를 생성할 것이다.
1-4. nodemon 설치
npm install nodemon
yarn add nodemon
서버와 클라이언트 통신을 원활히 확인하기 위해서는 서버가 계속 켜져있어야 한다. 서버쪽에 변동사항이 있을 경우, 서버가 재시작되도록 하고, 서버가 계속하여 켜져있도록 하기 위해 nodemon을 설치한다.
1-5. 서버 설정
const http = require("http");
const express = require("express");
const app = express();
const io = require('socket.io');

const httpServer = http.createServer(app).listen(3000);
// 3000번 포트에서 서버를 오픈한다.

const socketServer = io(httpServer, {
	cors: {
		origin: "*",
		methods: ["GET", "POST"]
	}
});
3000번 포트에서 노드의 익스프레스 서버를 열어준다. 또한 서버와 클라이언트의 도메인이 달라 CORS오류가 발생한다.
2. client 설정
2-0. package.json 생성
npm init -y
yarn init -y
2-1. 라이브러리 설치
- webpack 설치
npm install webpack webpack-cli webpack-dev-server html-webpack-plugin
yarn add webpack webpack-cli webpack-dev-server html-webpack-plugin- babel 설치
npm install @babel/core @babel/preset-env @babel/preset-react babel-loader
yarn add @babel/core @babel/preset-env @babel/preset-react babel-loader- react 설치
npm install react react-router react-router-dom
yarn add react react-router react-router-dom- socket.io-client 설치
npm install socket.io-client
yarn add socket.io-client
2-2. webpack 설정
const path = require('path');
const HtmlWebpackPlugin = require('html-webpack-plugin');

module.exports = {
   entry: './index.js',
   output: {
	  path: path.join(__dirname, '/bundle'),
	  filename: 'index_bundle.js'
   },
   devServer: {
	  port: 8001
   },
   module: {
	  rules: [
		 {
			test: /\.js?$/,
			exclude: /node_modules/,
			loader: 'babel-loader'
		 }
	  ]
   },
   plugins:[
	  new HtmlWebpackPlugin({
		 name: "index.html",
		 inject: false,
		 template: './index.html'
	  })
   ]
}
2-3. babel 설정
module.exports = {
	presets: [
	  '@babel/preset-env',
	  '@babel/preset-react',
	],
  }
2-4. index.html 생성
<!DOCTYPE html>
<html lang = "en">
   <head>
	  <meta charset = "UTF-8">
	  <title>React App</title>
   </head>
   <body>
	  <div id = "root"></div>
	  <script src = 'index_bundle.js'></script>
   </body>
</html>
webpack 빌드결과가 webpack.config.js의 output에 써져 있는데로 index_bundle.js에 저장되기에 script src에 index_bundle.js를 추가한다.
2-5. index.js 생성
import React from 'react';
import ReactDOM from 'react-dom';
import App from './apps/App';

ReactDOM.render(
  <App/>,
  document.getElementById("root")
);
2-6. App.js 생성
import React, { useEffect } from 'react';
import io from 'socket.io-client'; // Client Socket

/*
socket.on('connect', () => {
	console.log('client socket connect');
});
*/

const App = () => {

	const socket = io('http://localhost:3000', {
		cors: {
			origin: "*",
		}
	});

	socket.on('test', socket => {
		console.log(socket);
	})

	const handleRequestSocket = () => {
		socket.emit("test", {
			data: 'test socket on client'
		});
	}

	function handleChange() {
		console.log('change handle');
	}

	return (
		<div>
			test socket connection
			<button onClick={ handleRequestSocket }>Request</button>
			<input type="text" onChange={ handleChange } />
		</div>
	)
}

export default App;
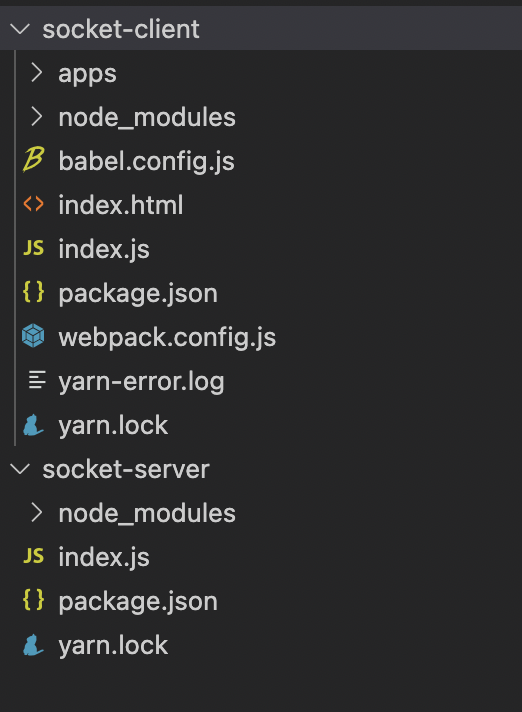
socket관련 클라이언트와 서버 부분을 설정하면 다음과 같은 디렉토리 모습을 하게 된다. socket-client/apps에는 App.js가 존재한다.
3. socket-server에 이벤트 추가
// socket-server/index.js

const http = require("http");
const express = require("express");
const app = express();
const io = require('socket.io');

const httpServer = http.createServer(app).listen(3000);

const socketServer = io(httpServer, {
	cors: {
		origin: "*",
		methods: ["GET", "POST"]
	}
});

// socketServer.on('connect');
socketServer.on('connect', (socket) => {
	socket.on('test', (req) => {
		console.log(req);
	});
});
soket-server의 index.js를 위와같이 수정한다.(socketServer.on ~ 부분을 추가한다.)
socketServer.on에 'connect'를 입력하여 connect라는 이벤트를 받을 때, 하위의 내용을 실행한다는 뜻이다.
connect이벤트는 추가적으로 설정한 것이 아니라, socketio에서 기본적으로 제공하는 이벤트이기 때문이다. 기본 이벤트에는 connet, disconnet, error 등이 있다.
- connect : 소켓에 연결이 성공했을 경우, 실행되는 이벤트이다.
- disconnect : 소켓 연결이 끊겼을 경우, 실행되는 이벤트이다.
- error : 에러가 발생했을 경우, 실행되는 이벤트이다.
이 외에는 사용자가 직접 이벤트를 생성하여 주고받도록 만들 수 있다. socket.on('test' ~ )와 같은 경우가 이벤트를 새로이 생성하여 주고받는 경우이다.
socket-server에서는 소켓에 연결되고 클라이언트로부터 test라는 이벤트가 전송되었을 때, 콘솔에 결과를 찍어내는 역할을 한다.
4. socket-client 이벤트
4-1. socket 연결
const socket = io('http://localhost:3000', {
    cors: {
        origin: "*",
    }
});
3000포트에 열려있는 소켓에 연결하는 부분이다. cors옵션을 추가하여 cors오류를 방지한다.
4-2. return 부분
return (
    <div>
        test socket connection
        <button onClick={ handleRequestSocket }>Request</button>
    </div>
)
버튼을 클릭하면 handleRequestSocket이라는 함수가 실행된다.
4-3. handleRequestSocket함수
const handleRequestSocket = () => {
    socket.emit("test", {
        data: 'test socket on client'
    });
}
해당 함수가 실행될 때, test라는 이벤트를 보낸다.
즉, 클라이언트는 localhost:8001에 접속하여, 화면에 있는 버튼을 클릭하면 소켓으로 이벤트가 보내지게 된다. 서버는 클라이언트에서 실행된 이벤트에 따라 해당 이벤트와 관련있는 부분을 실행시킨다. 이와 반대로, 서버에서 클라이언트로 이벤트를 보내면(emit) 클라이언트에서 이벤트를 받아(on) 적합한 내용을 실행시키도록 변형할 수 있다.
5. 소켓 클라이언트와 서버 실행법
# 서버
nodemon index.js

# 클라이언트
npm start
yarn start
6. 실행결과

위의 화면은 클라이언트 화면이다. Request라는 버튼을 클릭하면 서버로 이벤트를 보내게된다.
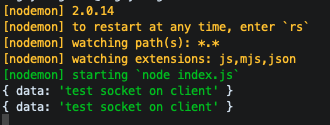
test라는 이벤트를 받으면 서버 콘솔에 위와같은 내용이 찍히게 된다.
const handleRequestSocket = () => {
    socket.emit("test", {
        data: 'test socket on client'
    });
}
버튼을 눌렀을 때 실행된 handleRequestSocket함수가 data : 'test socket on client'라는 내용을 전달했기에 콘솔에 위와 같이 찍히게 된다.
간단하게 socketio를 활용하여 서버와 클라이언트 간에 데이터를 주고받는 법을 살펴보았다. 조금더 심화적으로 들어가면 특정 클라이언트들을 각각의 방(room)에 추가하여 포함된 방에 따라 각각의 이벤트를 보내도록 할 수도 있다. 위와같은 심화부분은 다음번 포스팅에 다뤄보고자 한다.
socketio cors관련 옵션
https://github.com/expressjs/cors#configuration-options
GitHub - expressjs/cors: Node.js CORS middleware
Node.js CORS middleware. Contribute to expressjs/cors development by creating an account on GitHub.
github.com
socketio server 설정
https://socket.io/docs/v4/server-initialization/
Server Initialization | Socket.IO
Once you have installed the Socket.IO server library, you can now init the server. The complete list of options can be found here.
socket.io
socketio client 설정
https://socket.io/docs/v4/client-initialization/
Client Initialization | Socket.IO
Once you have installed the Socket.IO client library, you can now init the client. The complete list of options can be found here.
socket.io
react 프로젝트 생성법 예제
https://phsun102.tistory.com/43
React - Webpack + Babel 로 프로젝트 생성하기
1. package.json 생성 npm init -y yarn init -y 2. 리액트관련 라이브러리 추가 npm install -D react react-dom yarn add -D react react-dom 3. 웹팩관련 라이브러리 추가 npm install -D webpack webpack-cli..
phsun102.tistory.com
'Javascript > React.js' 카테고리의 다른 글
| React - useParams 사용법 (0) | 2022.04.15 |
|---|---|
| React - useHistory 사용법 (0) | 2022.04.14 |
| React - React DOMException: Failed to execute 'removeChild' on 'Node': The node to be removed is not a child of this node 에러 (0) | 2022.04.06 |
| React - 컴포넌트의 리렌더링 (0) | 2022.03.24 |
| React - useSelector를 활용한 리덕스 상태값 반환 (0) | 2022.03.23 |


